
Wednesday, 04 June 2020
autanabp
In this post we will review some of the administration tasks that can be done in VTiger.
Let’s start with the Users.
The first thing is to define, what is a user in VTiger. Users are the employees of the organization who can log in to their VTiger accounts, access information and perform tasks according to the permissions that have been defined for them.
In VTiger, only administrator users have the ability to create user accounts of the type: administration users and standard users.
In the onDemand version of VTiger, each active user has a monthly cost of approximately $12.
Let’s see how to create a user as one of the first tasks; In the following posts we will complete this article with other administrative tasks related to users and other options.
To create a user, let’s go to:
- Click on the tool icon in the upper right corner.
- Click on the Manage Users option
- Press the + Add User button.
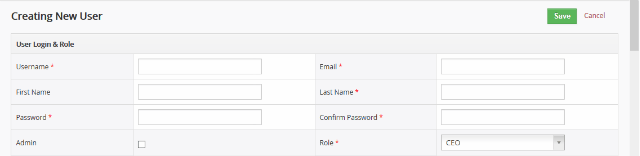
Fill in the following mandatory fields:
- User Name, you must enter a username in email address format. This field cannot be modified, so special care must be taken when selecting the email.
- In the Email field you have to enter an email that is unique in the system and that has not been used before, an email will be sent to this address after creating the user’s account.
- In the First Name and Last Name fields, enter the user’s first and last name.
- In the Password and Confirm Password fields, the user’s access password must be specified, this will be sent in the email you will receive after the creation of the account.
This password can be changed by the user himself, not necessarily the administrator, later we will tell you how to change this password.
- The Admin flag will be checked if the user is an Administrator user to grant administrator privileges.
- In the Role field, select the appropriate role for the type of user being created.
There are other fields that are not mandatory but have default values and can be modified without any problem.
In the Calendar Settings section, you define the format of date, time, work start time in the calendar, time zone, etc.
In the Currency Configuration section, you configure the values of the usage currency.
There is another section, More Information, in which you can configure more additional options for the user, such as Department, mobile, Application language.
In User Address we have the user’s address options.
There are more options, you can even upload the user’s photograph in User Photograph.
After filling in all the desired and mandatory fields, press the Save button to save all the changes.
